Just a short digression into my latest hobby – creating Terrariums.
I love gardening and plants in general (I used to be a professional botanist in a earlier life), but I was very taken with the middle photo recently – isn’t it gorgeous?

I have been trying to find Lady Slipper orchids to create my own, but they are really hard to find. (If anyone knows where to find them on Vancouver Island or Vancouver / Lower mainland, please let me know).
I started looking out for apothecary jars and other suitable glassware in TS, and found lots! For a few dollars one can find all sorts of lidded glass containers, and turn them into terrariums with a few small plants from your local nursery.

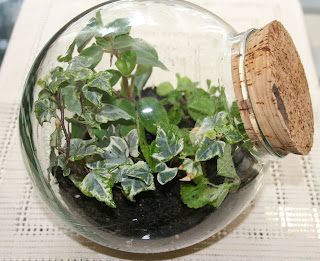
One has to use plants that come in 2 inch pots – anything else has a root ball that is just too deep. The plants at the rear of the photo proved to be too big for my jar -it is a good idea to measure your jar before shopping for plants. Tropical plants, mosses and ferns are suitable choices -if the jar is sealed. Sealed jars have high humidity, so the main problem you will find is plants dying because they don’t like their “feet wet”- cannot tolerate soil that is too wet.

Rot and mould set in pretty quickly so one has to be very careful not to over-water. In fact, if your soil is damp, don’t add any more water. What there is in the jar, will be recycled by the plants, and you will hardly ever have to water at all. If there is a lot of condensation on the inside of the container, remove the lid for a few hours to let it dry out.
Unsealed terrariums created with succulents and cacti are also great – that is next on my list of projects to do.
 Even if the jar /container is not sealed, it still acts as a greenhouse / hot house, so be careful of placing terrariums in direct sunlight or the plants will literally “cook” in the heat.
Here is my quick “how to”:
1. Find a suitable clear glass jar (Thrift stores are great for this). None of these cost more than a few dollars. Cookie jars, storage containers and large Mason Jars work just great! To start with, select jars you can get your hand into. Wash and dry them well to get rid of any possible substances that may kill your plants.

2. Place a 1/2 inch layer of washed pebbles on the bottom of the container for drainage:

3. Pat the pebbles down, then add a 1/2 inch of sand (if you use sea sand from a beach, wash it well first to get rid of the salt). Pat it down well. I like to see the well-defined layers…

4. Add about 1/4 inch of potting soil (very sparing if using cacti/succulents) – once you add your plants, you will add more.

Arrange your plants in an attractive display outside the jar first, then remove them from their pots GENTLY. Place them in the jar, with some taller plants towards the middle and smaller ones around the outside. I like to use variegated plants to add interest. Miniature African Violets (Saintpaulia)are great for adding a pop of colour.

5. Fill up the spaces between the plats with soil sparingly! Pat the soils down with fingertips.
6. Clean the inside of the glass again. Resist the urge to water. Replace the lid/stopper. Avoid placing the terrarium in direct sunlight.
Here the large terrarium is in situ in my sunroom.

Tammy has totally piqued my interest in tangerine..nothing says SPRING like tangerine!
Have a great day,
Pippa
I love gardening and plants in general (I used to be a professional botanist in a earlier life), but I was very taken with the middle photo recently – isn’t it gorgeous?

I have been trying to find Lady Slipper orchids to create my own, but they are really hard to find. (If anyone knows where to find them on Vancouver Island or Vancouver / Lower mainland, please let me know).
I started looking out for apothecary jars and other suitable glassware in TS, and found lots! For a few dollars one can find all sorts of lidded glass containers, and turn them into terrariums with a few small plants from your local nursery.

One has to use plants that come in 2 inch pots – anything else has a root ball that is just too deep. The plants at the rear of the photo proved to be too big for my jar -it is a good idea to measure your jar before shopping for plants. Tropical plants, mosses and ferns are suitable choices -if the jar is sealed. Sealed jars have high humidity, so the main problem you will find is plants dying because they don’t like their “feet wet”- cannot tolerate soil that is too wet.

Rot and mould set in pretty quickly so one has to be very careful not to over-water. In fact, if your soil is damp, don’t add any more water. What there is in the jar, will be recycled by the plants, and you will hardly ever have to water at all. If there is a lot of condensation on the inside of the container, remove the lid for a few hours to let it dry out.
Unsealed terrariums created with succulents and cacti are also great – that is next on my list of projects to do.
Here is my quick “how to”:
1. Find a suitable clear glass jar (Thrift stores are great for this). None of these cost more than a few dollars. Cookie jars, storage containers and large Mason Jars work just great! To start with, select jars you can get your hand into. Wash and dry them well to get rid of any possible substances that may kill your plants.

2. Place a 1/2 inch layer of washed pebbles on the bottom of the container for drainage:

3. Pat the pebbles down, then add a 1/2 inch of sand (if you use sea sand from a beach, wash it well first to get rid of the salt). Pat it down well. I like to see the well-defined layers…

4. Add about 1/4 inch of potting soil (very sparing if using cacti/succulents) – once you add your plants, you will add more.

Arrange your plants in an attractive display outside the jar first, then remove them from their pots GENTLY. Place them in the jar, with some taller plants towards the middle and smaller ones around the outside. I like to use variegated plants to add interest. Miniature African Violets (Saintpaulia)are great for adding a pop of colour.

5. Fill up the spaces between the plats with soil sparingly! Pat the soils down with fingertips.
6. Clean the inside of the glass again. Resist the urge to water. Replace the lid/stopper. Avoid placing the terrarium in direct sunlight.

Here the large terrarium is in situ in my sunroom.

Tammy has totally piqued my interest in tangerine..nothing says SPRING like tangerine!
Have a great day,
Pippa
This is great! I'll just have to finish that extra large family jar of olives in the fridge and then I can try it out! I've always liked terrariums but never tried out making one before!
ReplyDelete